Friday, December 16, 2011

Fellow Knitters

For that hard-to-buy-for chicken in your life.

May you get all of your holiday projects done in time.
Happy Christmas/Hanukkah!
-Jules


Tuesday, November 15, 2011

Chair Rehab

Happy Fall Dearest Bloggites!
Before this summer our chair situation at home was dire.  We had a bizarro collection of dining room chairs that consisted of a few cafe chairs with too-small seats, a couple IKEA hand-me-downs, and a school chair we'd picked up on the streets of Brooklyn back when we couldn't even afford IKEA.  On the porch we'd been through a few sets of cheapo lawn chairs from Target.  It was a sad state of affairs. 
While I was visiting the folks in Ohio, my dad took me to the annual Seville town-wide garage sale.  While there we saw this funny dog whose owner was trying to sell his modified vintage VW.  Apparently, his dog wasn't too keen on that idea because he would pace around and growl at anyone who tried to check out the car too closely.
Then his dog buddies from the neighborhood decided to join him which was hilarious. 
So after the photo opportunity, I found this vintage lawn chair set in very nice condition.  Two chairs and little table.  Just what our porch needed!
So I managed to cram them into my Honda and drove them back to NY.
First we lightly sanded over the chairs to get any rough, rusty spots off.  Then we got some metal furniture primer which comes in handy spray cans. 
We chose our Krylon colors (went with a creamsicle theme).
This is when we realized we were going to need lots more cans.  Like half a dozen more.  Anyway, when all was said and done and we had inhaled lots of hazardous fumes we had brand spanking new/old chairs!
 Ready for a summer cocktail!
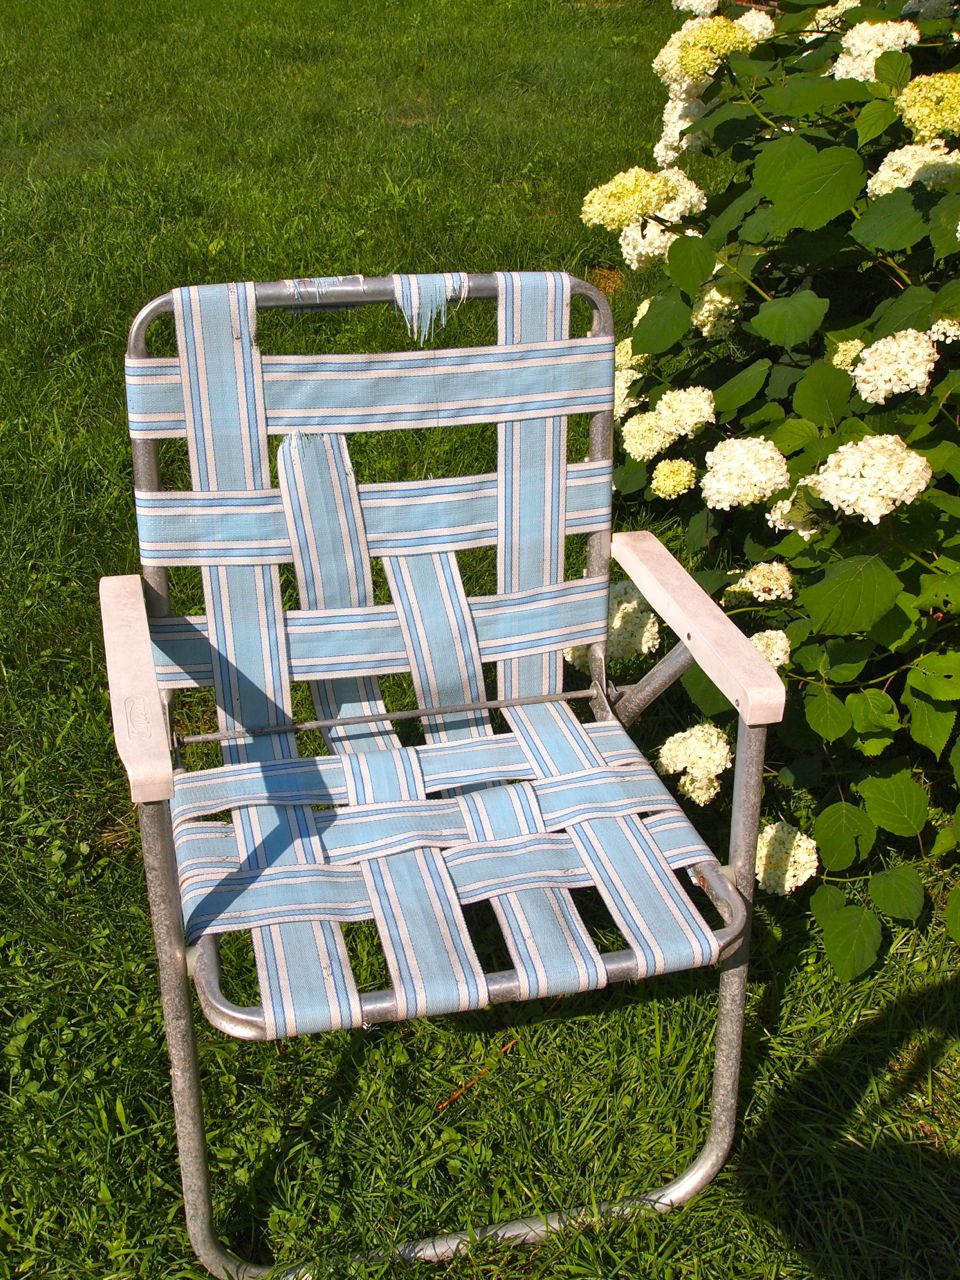
As part of our former decrepit porch ensemble was an old Sunbeam aluminum lawn chair that some friends had foisted on us when they moved out of town.  It basically disintegrated one day when someone sat in it.
So sad :(
We were going to pitch it but then I found out that you can buy new webbing for these chairs and re-seat them yourself.  So I ordered up the kit and in about 20 minutes the chair had itself a lovely face lift.
Happy chair!
My final chair project was the most satisfying one.  I am a craigslist junkie and am always trolling around for treasures/crap-I-don't-need.  I came across a set of Heywood-Wakefield chairs that a pair of empty nesters were getting rid off.  It was a real steal to get six chairs in good condition.  A few months later I got another, even better, deal of the mid-century.  It was a danish modern table that opened from a square to a rectangle in perfect condition.  A score for $75!! 
Pip approves
The only problem was that the chairs came covered in a less than desirable fabric. 
I bought some Marimekko fabric on Ebay (another unhealthy obsession) and went to work.  I had to rip out a lot of staples to get the original fabric off.  The padding was in ok shape so I just cut the new fabric using the old as a pattern.
With Robin's help using a heavy duty mechanical stapler we nailed those suckers down one at a time.  It took awhile to stretch the fabric so there weren't a lot of creases, especially in the corners, but it was so worth it.  Look how cute!
So that covers just about every chair in the house.  Going to go sit down now.
Byeeeee!


Friday, November 11, 2011

In case you needed reminding...

Worst. Blogger. Ever.

Monday, September 5, 2011

Shower Gifts Pt. 3


Hello Workers of the World!
Just in case you thought I was the worst, most inconsistent blogger ever, I'll have you know that I am writing this on LABOR DAY.  I hope the union doesn't find out...

So, onto the third of my multitude of gifts for Christina's baby shower.  This one I made from a pattern by Etsy super star, Amy Gaines.  She makes the cutest crochet patterned creatures, like this:
And this:
And these!
AGHHHH!  Can't stand the cuteness!
I decided to make this weather-themed mobile so they could hang it up over the crib or whatever people do with mobiles.  First I had to make all the different pieces parts.  The recipe called for one sun, one cloud and two rain drops. 
After all parties were present I proceeded to embroider faces on them, because weather phenomena should have personalities, right?
From drab...
to fab!!
These guys are just too cute.
Hello sunshine!


Mr. Cloud got some rosy cheeks. 
 
Put it all together and...drumroll... 
Tadaaaah!
This was almost one of those "too cute to give away" things but then, what the heck am I going to do with a crocheted weather mobile??

Maybe the baby will grow up to be a meteorologist. 

Byeeee!

Thursday, August 18, 2011

Shower Gifts Pt. 2

Good Morning, Blogolites!
Well, it's been about a month since my last post which officially makes me the worst blogger in the entire blogosphere.  In my defense, I've been having a wonderful summer.  Lots of tennis and grilling and hanging out on the porch.  We also did a lot of home improvement type stuff such as replace the water heater (excitement), get a new fridge (with an ice maker!) and have some landscaping done.  Anyway, back-to-school is fast approaching so I better finish up these shower posts before the baby goes off to college. 

Part two is going to be a baby changing set.  It consists of a fold-up-able pad and a little pouch to put diapers and wipes in.  I also made a drawstring bag to put everything in which you will see when I post the pics of the finished shower basket.  You can expect that post by Spring 2013, I'd imagine.

The changing pad tutorial was from a blog, homemade by jill.  I liked it because it had a smart little trim around the outside.  I'm a sucker for smart little trims.  For both projects I used this zoo print from Alexander Henry.  Lots of cute little animules to look at while you're wiping poo off your face or whatever kind of trials new parents have to endure. 
It's really just a double sided little blankie with a fleece batting in between the layers for cushiness.  I used polyester batting (I know, the HORROR) because I heard it cleans and dries a lot faster than natural fiber battings.  And, let's face it people, when we're dealing with numbers 1 AND possibly 2, the easier to clean, the better, no?
For this project I learned how to sew on seam binding.  It's a wonderful miraculous invention that let's one finish a seam without hemming and end up with a nice clean edging.  Here I am applying the seam binding:
Like a pro.
FYI, if you are ever trying to make something and you run across some material or technique that you really don't understand, do what I do: YouTube.  There are about a million and one videos on how to do just about everything.  It is YouTube who taught me how to buttonhole, blanket stitch, blind hem, you name it.  I honestly don't know what people did before it.  I guess they asked their mothers.  Since most mothers these days don't sew and mine lives 600 miles away it's good to know that Mother YouTube is always there. 
So here is the finished pad.
Side A
Side B
Sides A & B
There's a little loop and a little button so you can fold it all up and shove it in your diaper bag.  I imagine that new mothers do a lot of shoving of things in bags.  Just a guess.
Fold
Loop/button
Ready for shoving
Now, on to the diaper pouch!  I thought the tutorial at blog called, Noodlehead, was very cute and practical.  The pouch is lined with canvas and has little strap that attaches with velcro.  Easy access because when you need a diaper, you need one NOW.
Mit diapers.
Mit wipes.
Ready for battle.
The diapers I bought were so teeny tiny--for newborns.  I made the pouch bigger for expanding bottom sizes.  Always thinking to the future...
So here's my little set. 

Bring on the poo!
Byeeee!